Now I need to step into the hardware side: connecting the driver with the CNC shield and the Arduino Uno:
1. Plug DRV8825 driver onto the Protoneer CNC shield:
Check the driver pins...
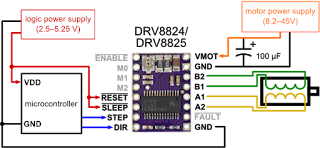
match the CNC shield pins:

So it looks like this:

2. Plug a power supply to the CNC shield
The one on the picture below is a 24 v x 6.5 A. It's more than needed for just a test but as I plan to have at least two stepper motors, it should be enough: http://www.gotronic.fr/art-alimentation-rs150-24-20113.htm#

3. Plug-in the Arduino to the USB port of the PC
4. Switch-on the CNC power supply
5. Configure the current limit of my driver
As very well explained on Pololu website, drivers need to be configured to make sure that the current they send does not exceed what the stepper motor can take. The following video explains it in more detail step by step:
In my case, my stepper motor 42BYGH47-401A shows the following specifications:
Note 1: I was puzzled by the voltage spec as the same motor reference showed different voltage from one web site to another; in some cases down to 2.8 V. Eventually I came across the fact that rated voltage is not really relevant for stepper motors. On the contrary, the current limit is key to preserve the stepper motor. So I can power my stepper motor with my 24 V power supply.
As per the driver specification, if I want a max 1.5 A to be sent to my stepper motor, I need to set my DRV8825 Vref to 0.75 V ; so Vref x 2 = 1.5.
Note 2: the driver is set in "Full step", so no jumper have been placed on the CNC shield for that configuration.
With my multi-tester, I test the voltage between the screw of the potentiometer and the lower right pin (GND): I turn the potentiometer so the voltage shows 0.75 V.
Done !
6. Switch off the power supply and unplug the Arduino from the USB port of the PC
I am now ready to plug my stepper motor.
1. Plug DRV8825 driver onto the Protoneer CNC shield:
Check the driver pins...

match the CNC shield pins:

So it looks like this:

2. Plug a power supply to the CNC shield
The one on the picture below is a 24 v x 6.5 A. It's more than needed for just a test but as I plan to have at least two stepper motors, it should be enough: http://www.gotronic.fr/art-alimentation-rs150-24-20113.htm#

3. Plug-in the Arduino to the USB port of the PC
4. Switch-on the CNC power supply
5. Configure the current limit of my driver
As very well explained on Pololu website, drivers need to be configured to make sure that the current they send does not exceed what the stepper motor can take. The following video explains it in more detail step by step:
In my case, my stepper motor 42BYGH47-401A shows the following specifications:
- Phase: 2
- Step Angle: 1.8°
- Voltage: 24 V
- Phase Current: 1.5A/Phase
- Phase Resistance: 1.6ohm/Phase
- Phase inductance: 2.8mH/Phase
- Holding Torque: 5500g.cm
- Lead Wire: 4
- Insulation Class: B
Note 1: I was puzzled by the voltage spec as the same motor reference showed different voltage from one web site to another; in some cases down to 2.8 V. Eventually I came across the fact that rated voltage is not really relevant for stepper motors. On the contrary, the current limit is key to preserve the stepper motor. So I can power my stepper motor with my 24 V power supply.
As per the driver specification, if I want a max 1.5 A to be sent to my stepper motor, I need to set my DRV8825 Vref to 0.75 V ; so Vref x 2 = 1.5.
Note 2: the driver is set in "Full step", so no jumper have been placed on the CNC shield for that configuration.
With my multi-tester, I test the voltage between the screw of the potentiometer and the lower right pin (GND): I turn the potentiometer so the voltage shows 0.75 V.
Done !
6. Switch off the power supply and unplug the Arduino from the USB port of the PC
I am now ready to plug my stepper motor.
Hi. My protoneer v3 works well with the A4988, but getting it to work with the DRV8825 seems futile. It doesn't make a sound. Tried to solder q 4,7k resistor to it and then it moved erratically and without any commands, so it isn't the 20a model. What else could I check for?
ReplyDeleteSorry, not sure to understand what you are trying achieve here / I would need more details. And first why bother with DRV8825 if it works well with A4988?
DeleteAs soon as I discovered this internet site I went on reddit to share some of the love with them. cnc
ReplyDelete